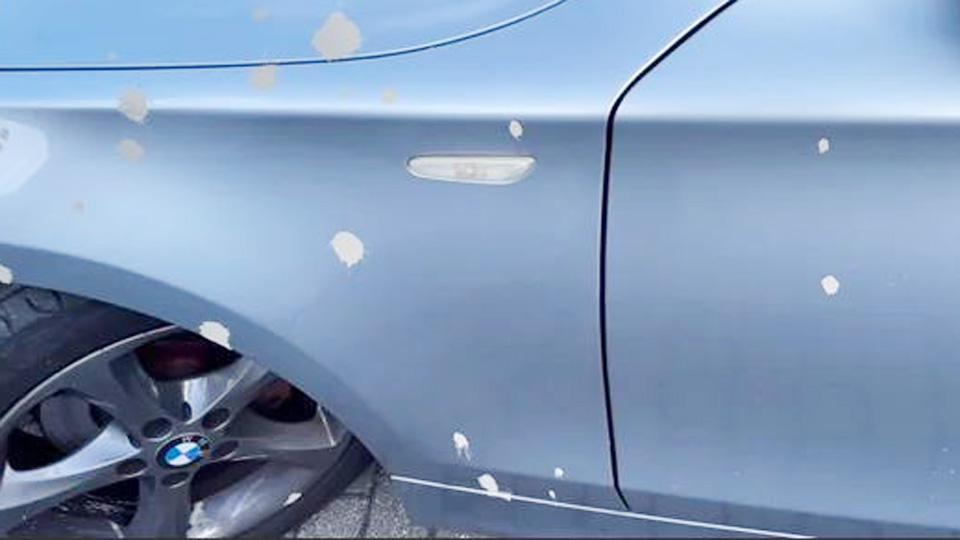
You park your car near a construction site, and the next morning, you find ugly, hardened cement splattered across your hood. As a car enthusiast who’s spent countless hours in the garage, I’ve seen this kind of mess before. Removing cement from a car without damaging the paint is tricky but doable with the right approach, tools, and patience.
Whether you’re a DIY mechanic, a car owner, or an auto student, this guide will walk you through the process step-by-step, sharing hands-on insights from my years wrenching on vehicles. Cement isn’t just a cosmetic issue—it can harm your car’s paint, clear coat, and resale value if not addressed properly.
In this article, I’ll cover why protecting your car’s paint matters, the best methods to remove cement safely, tools you’ll need, and how to avoid common mistakes. I’ll also share real-world anecdotes from my time in the shop and practical tips to keep your vehicle looking pristine.

Photo by reddit
Why Protecting Your Car’s Paint Matters
What Is Car Paint and Its Role?
Your car’s paint isn’t just for looks. It’s a protective layer that shields the metal body from rust, UV rays, and environmental damage. The paint system typically includes a primer, base coat, and clear coat. Cement, being alkaline and abrasive, can etch into the clear coat, dull the finish, or even cause permanent damage if left untreated. In my years working on cars, I’ve seen neglected cement splatter lead to costly repaints—something no car owner wants.
Common Problems with Cement on Paint
Cement hardens quickly and bonds to the clear coat, making it tough to remove without scratching. If it’s fresh, it’s slightly easier to handle, but dried cement can be a nightmare. Common issues include:
- Etching: The alkaline nature of cement can chemically burn the clear coat.
- Scratches: Improper removal methods (like scraping) can leave swirl marks or deep scratches.
- Discoloration: Prolonged exposure can dull the paint or leave hazy spots.
When and Why Removal Is Needed
You need to act fast—ideally within 24–48 hours. The longer cement sits, the more it bonds to the paint, increasing the risk of damage. Removal is critical not just for aesthetics but to maintain your car’s value and prevent corrosion. A clean, undamaged paint job also boosts fuel efficiency slightly by reducing drag from surface imperfections.
OEM vs Aftermarket Paint Protection Products
For this job, you’ll need cleaning solutions and protective products. OEM (Original Equipment Manufacturer) products, like those from GM or Toyota, are formulated for specific vehicles but can be pricey. Aftermarket options, like Meguiar’s or Chemical Guys, are more affordable and widely available at places like AutoZone or Advance Auto Parts. Here’s a quick comparison:
| Product Type | Pros | Cons | Price Range (USD) | Popular Brands |
|---|---|---|---|---|
| OEM Cleaners/Protectants | Tailored to vehicle, high-quality | Expensive, limited availability | $20–$50 | GM, Ford, Honda |
| Aftermarket Cleaners/Protectants | Affordable, versatile, easy to find | May require testing for compatibility | $10–$30 | Meguiar’s, Turtle Wax, Chemical Guys |
Installation Tips and Common Mistakes
When removing cement, the goal is to dissolve it without harming the paint. Here’s what I’ve learned from trial and error:
- Test First: Always test any cleaner on a small, hidden area (like under the hood).
- Use Soft Tools: Microfiber cloths and soft brushes prevent scratches.
- Avoid Abrasives: Stay away from steel wool or harsh scrubbers—they’ll ruin your paint.
- Work in Sections: Tackle one small area at a time to avoid streaking or uneven cleaning.
Personal Anecdote: A customer once brought in a Ford F-150 with cement splattered from a construction site. They’d tried scrubbing it with a kitchen sponge—big mistake. The scratches were so bad we had to polish the hood extensively. Patience and the right tools could’ve saved them hundreds.
Tools and Materials You’ll Need
To remove cement safely, you’ll need specific tools and products. Here’s what I keep in my garage for jobs like this:
- White Vinegar or Automotive-Grade Acidic Cleaner: Dissolves cement’s alkaline compounds.
- Microfiber Cloths: Soft, non-abrasive, and absorbent.
- Plastic Razor Blade: For gentle scraping without scratching.
- Clay Bar: Removes embedded contaminants post-cleaning.
- Car Wash Soap: pH-neutral to clean the area afterward.
- Wax or Sealant: To protect the paint after removal.
- Spray Bottle: For applying vinegar or cleaner.
- Bucket and Water: For rinsing.
- Polishing Compound (Optional): For minor scratches or haze.
Safety Tip: Wear gloves and eye protection—cement and acidic cleaners can irritate skin or eyes.
Step-by-Step Guide to Removing Cement from Car Paint
Step 1: Assess the Damage
Before you start, check how bad the cement splatter is. Is it fresh (still wet) or hardened? Small splatters are easier to handle than large chunks. In my shop, I’ve seen everything from tiny dots on a Honda Civic to a full hood caked on a Dodge Ram. The approach varies slightly based on severity.
Step 2: Rinse the Area
Start by rinsing the affected area with water to remove loose dirt or debris. Use a hose with a gentle spray to avoid pushing the cement deeper into the paint. I once had a client who skipped this step and ended up grinding dirt into the clear coat—don’t make that mistake.
Step 3: Soften the Cement with Vinegar
White vinegar is your best friend here. It’s acidic enough to break down cement without harming most clear coats. Pour vinegar into a spray bottle and soak the cement splatter generously. Let it sit for 10–15 minutes. For stubborn spots, I’ve wrapped a vinegar-soaked microfiber cloth around the area and left it for 20 minutes. Pro tip: Warm vinegar works faster.
Alternative: If vinegar isn’t cutting it, try an automotive-grade acidic cleaner like P21S Total Auto Wash. Follow the instructions carefully—these are stronger than vinegar.
Step 4: Gently Scrape (If Needed)
For hardened cement, use a plastic razor blade to gently lift it off. Hold the blade at a 45-degree angle and work slowly. I’ve found that rushing this step leads to scratches, especially on softer paints like those on some Toyota models. If the cement doesn’t budge, reapply vinegar and wait longer.
Step 5: Clean with a Clay Bar
Once the cement is gone, there may be tiny residues embedded in the paint. A clay bar, like one from Meguiar’s, can remove these without damaging the surface. Lubricate the area with a clay bar lubricant or soapy water, then glide the clay gently over the spot. I’ve used this trick on countless cars—it’s like magic for restoring smoothness.
Step 6: Wash and Rinse
Wash the area with pH-neutral car soap to remove any vinegar or cleaner residue. Rinse thoroughly. I always double-check for leftover haze or dullness, especially on dark-colored cars where imperfections show up easily.
Step 7: Polish (If Necessary)
If you notice minor scratches or haze, use a mild polishing compound with a microfiber applicator. Work in small, circular motions. I’ve polished many cars after cement removal, and it’s saved the finish on vehicles like a Chevy Malibu I worked on last year.
Step 8: Protect with Wax or Sealant
Finish by applying a wax or sealant to restore shine and protect the paint. Turtle Wax’s Hybrid Solutions is a solid, budget-friendly choice available at most US auto stores. This step is crucial to prevent future damage, especially if your car is exposed to harsh weather.
Common Mistake: Skipping the wax. I’ve seen DIYers clean cement off perfectly but leave the paint unprotected, leading to UV damage or new stains within weeks.
OEM vs Aftermarket Cleaning Products: Which Is Better?
When choosing cleaning products, you’ll face the OEM vs aftermarket debate. OEM products are designed for your car’s specific paint system, which is great for high-end vehicles like BMWs or Audis.
For example, Mercedes-Benz offers a paint cleaner that’s safe for their clear coats but costs $30 for a small bottle. Aftermarket brands like Chemical Guys or Griot’s Garage are more versatile and often cheaper, with bottles starting at $10–15.
Here’s a breakdown based on my experience:
| Option | OEM | Aftermarket |
|---|---|---|
| Compatibility | Perfect for specific makes | Broadly compatible, may need testing |
| Cost | $20–$50 | $10–$30 |
| Availability | Dealerships, online | AutoZone, Amazon, Walmart |
| Performance | Reliable, consistent | Varies by brand; some outperform OEM |
| Examples | GM Touch-Up Paint Cleaner, Toyota Clear Coat Restorer | Meguiar’s Ultimate Compound, 3M Perfect-It |
My Take: For most DIYers, aftermarket products are fine if you choose reputable brands. I’ve used Meguiar’s on everything from a beat-up Jeep Wrangler to a pristine Lexus RX, and it’s never let me down. Just avoid no-name products from sketchy online sellers—they can be diluted or worse, abrasive.
How to Spot Genuine vs Fake Products
Counterfeit automotive products are a real problem, especially online. I once bought a “deal” on a polishing compound that turned out to be watered-down junk. Here’s how to avoid fakes:
- Buy from Reputable Retailers: Stick to AutoZone, Advance Auto Parts, or Amazon’s verified sellers.
- Check Packaging: Genuine products have high-quality labels, batch numbers, and clear branding. Fakes often have blurry logos or misspellings.
- Price Check: If a $30 Meguiar’s product is listed for $5, it’s likely fake.
- Read Reviews: Look for detailed user reviews on sites like Amazon or automotive forums.
- Verify Holograms or Seals: Many brands, like 3M, include authenticity seals.
Anecdote: A buddy of mine bought a fake clay bar online. It crumbled during use and scratched his Mustang’s hood. Always double-check your source.
Maintenance Tips to Prevent Future Damage
Once you’ve removed the cement, protect your car’s paint to avoid future headaches:
- Regular Washing: Wash your car every 1–2 weeks with pH-neutral soap to prevent contaminant buildup.
- Wax Every 3 Months: A good wax (like Carnauba-based ones) adds a protective layer.
- Park Smart: Avoid construction zones or areas with loose gravel. I learned this the hard way after parking my old Camaro near a cement mixer.
- Use a Car Cover: If you can’t avoid risky areas, a breathable car cover is a lifesaver.
- Inspect Regularly: Check your paint for new spots or damage, especially after driving near construction sites.
Common Mistakes to Avoid
I’ve seen plenty of DIYers and even pros mess this up. Here are pitfalls to dodge:
- Using Household Cleaners: Dish soap or bleach can strip wax and damage paint.
- Scrubbing Too Hard: Aggressive scrubbing causes swirl marks. Be gentle.
- Skipping Protection: Not waxing after cleaning leaves your paint vulnerable.
- Ignoring Small Spots: Tiny cement splatters can still etch if left untreated.
Story Time: A client once tried removing cement with a wire brush—yep, a wire brush. The damage was so bad we had to sand and repaint the entire panel. Patience and the right tools are everything.
Conclusion
Removing cement from your car without damaging the paint is all about acting fast, using the right tools, and following a careful process. From vinegar soaks to clay bar treatments, the steps I’ve shared come from years of hands-on work in the garage. Whether you’re a weekend warrior or a pro mechanic, protecting your car’s paint preserves its value, performance, and curb appeal.
Always keep a bottle of white vinegar and a microfiber cloth in your trunk—you never know when a construction site will throw a curveball.
By choosing quality products (OEM or trusted aftermarket), verifying authenticity, and maintaining your car regularly, you’ll keep it looking showroom-ready. Got cement on your car? Don’t panic—just follow this guide, and you’ll have it sparkling again in no time.
FAQ
How Long Can Cement Stay on Car Paint Before It Causes Damage?
Cement can start etching paint within 24–48 hours, especially in hot or humid conditions. Act as soon as possible to avoid permanent marks. I’ve seen cars with cement left for weeks needing full repaints.
Can I Use Household Vinegar to Remove Cement?
Yes, white vinegar is safe and effective for most car paints. Soak the cement for 10–15 minutes, then gently wipe or scrape with a plastic blade. Test on a small area first to be sure.
What’s the Best Product to Protect Paint After Cement Removal?
A quality wax or sealant, like Turtle Wax Hybrid Solutions or Meguiar’s Ultimate Liquid Wax, works well. Apply every 3 months for ongoing protection. I use these on my own cars with great results.
Are Plastic Razor Blades Safe for Car Paint?
Yes, plastic razor blades are designed to be non-abrasive and safe for paint when used carefully. Hold at a 45-degree angle and avoid excessive pressure to prevent scratches.
Can I Remove Cement from Glass the Same Way?
Cement on glass is easier to remove since glass is less porous. Use vinegar or a glass-safe cleaner and a plastic blade. Avoid abrasive tools to prevent micro-scratches on windshields or windows.


