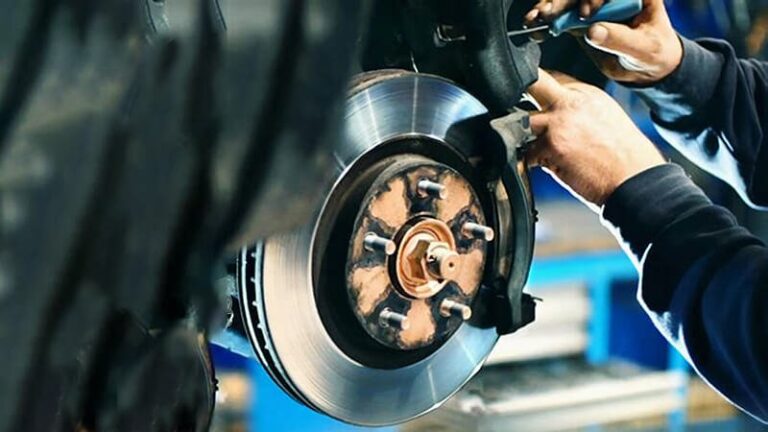
Brake pads aren’t supposed to feel welded in place—but if you’ve ever tried a DIY brake job, you know sometimes they just won’t budge. Rust, dirt, or even uneven wear can lock them into the caliper bracket and make a simple pad change a headache. If you’ve been asking yourself How to Loosen Brake Pads on a Car, the trick is patience and the right approach, not brute force.
I’ve seen plenty of calipers damaged because someone grabbed a hammer before trying the basics. Usually, a little penetrating oil, the proper socket or C-clamp, and some careful leverage are all it takes to free stuck pads safely. Once you know the process, loosening them is straightforward—and you’ll avoid turning a quick brake job into an expensive repair.
Image by serviceprosautomotive
What Are Brake Pads and How Do They Work?
Brake pads are essentially composite blocks—usually made from ceramic, organic, or semi-metallic materials—that press against your brake rotors to create friction and stop the wheels from spinning. When you hit the brake pedal, hydraulic fluid pushes the caliper pistons, clamping the pads onto the rotor like a vise.
In a typical disc brake system, which most modern cars use, there are inner and outer pads per wheel. The outer one is fixed, while the inner slides with the piston. Over time, as they wear, they can get compressed or misaligned, making them feel “tight” or hard to loosen. I’ve worked on countless vehicles where the pads were so embedded from heat and debris that it took a pry bar and some patience to free them.
Why does this matter for you? Safety first—worn or stuck pads reduce braking efficiency, increasing accident risk. Performance dips too; drag from tight pads can lower MPG by 1-2 points on highways. Reliability comes into play with even wear; uneven pads chew up rotors faster. And cost? Replacing pads early prevents $300 rotor jobs turning into $800 full brake overhauls.
Common Problems with Brake Pads and Signs They’re Stuck
From my time under the hood, the biggest issues with brake pads stem from wear, contamination, or poor installation. Stuck pads often happen in humid climates like the Midwest or Northeast US, where rust builds up on the caliper brackets. I’ve pulled wheels off Fords and Chevys where the pads were corroded in place, causing uneven braking or that annoying squeal.
Signs your pads need loosening? Listen for grinding noises—that’s metal on metal, meaning the friction material is gone. Squeaking could be the wear indicator tab rubbing the rotor. If your car pulls to one side when braking, pads might be seizing unevenly. Vibration in the pedal? Warped rotors from overheated, stuck pads. And if stopping takes longer, especially in wet weather, it’s time to check.
I’ve had customers roll in with Toyotas complaining of a “dragging” feel, only to find pads frozen from salt buildup after a harsh winter. Early detection saves big; ignoring it leads to scored rotors or failed calipers.
When and Why You Need to Loosen or Replace Brake Pads
Loosening brake pads isn’t always about full replacement—sometimes it’s maintenance to prevent seizing. I recommend checking every 10,000-15,000 miles, or during tire rotations. If pads are below 3mm thick, replace them. But if they’re thicker yet stuck, loosening frees them up for better operation.
Why bother? Safety: Stuck pads overheat, leading to brake fade on long descents. Performance: Free-moving pads ensure smooth stops without judder. Cost: Loosening and lubing can extend pad life by 5,000-10,000 miles, saving $100+ per axle. Reliability: Prevents cascade failures like piston damage. Fuel efficiency: Reduces drag, potentially boosting MPG by up to 5% in city driving.
In my shop, I’ve loosened pads on Hondas where owners ignored squeals, turning a 30-minute job into hours of rotor resurfacing. Don’t wait—proactive care keeps you rolling safely.
OEM vs Aftermarket Brake Pads: Making the Right Choice for Your Ride
When it’s time for new pads, the debate is always OEM versus aftermarket. OEM (Original Equipment Manufacturer) pads come from your car’s maker—like Genuine GM for Chevrolets or Mopar for Dodges. They’re designed to match factory specs, ensuring quiet, dust-free braking. But they cost more—$80-150 per axle.
Aftermarket options, like from Bosch, Wagner, or Akebono, are cheaper ($40-100) and often perform similarly or better in specific areas. Ceramic aftermarkets reduce dust on wheels, great for show cars, while semi-metallic ones handle heat better for trucks.
From experience, I’ve installed OEM on luxury rides like BMWs for that perfect fit, but for daily drivers like my old Ford F-150, aftermarket Raybestos pads held up just fine through towing jobs. Pros of OEM: Exact fit, warranty coverage. Cons: Pricey, sometimes overkill. Aftermarket pros: Affordable, variety (low-dust, high-performance). Cons: Quality varies; cheap ones wear fast or squeal.
Here’s a quick comparison table based on US market options for a common sedan like a Toyota Camry:
| Feature | OEM (Toyota Genuine) | Aftermarket (Bosch QuietCast) | Aftermarket (Power Stop Z23) |
|---|---|---|---|
| Price per Axle | $120-150 | $50-80 | $60-90 |
| Material | Organic/Ceramic | Ceramic | Carbon-Fiber Ceramic |
| Dust Level | Low | Very Low | Low |
| Noise | Minimal | Quiet | Some Squeal Initially |
| Durability (Miles) | 40,000-60,000 | 30,000-50,000 | 50,000+ for Aggressive Driving |
| Best For | Daily Commuting | Clean Wheels | Performance/Towing |
Choose based on your driving—city stop-and-go? Go low-dust. Highway hauler? Prioritize heat resistance.
Step-by-Step Guide: How to Loosen Brake Pads on Your Car
I’ve done this hundreds of times, from quick driveway fixes to full shop overhauls. Safety first: Park on level ground, chock wheels, wear gloves and eye protection. Tools? Jack, stands, lug wrench, C-clamp, pry bar, brake cleaner, anti-seize lube, torque wrench.
Step 1: Loosen lug nuts slightly before jacking. Jack up the car, secure on stands, remove wheel.
Step 2: Inspect the caliper—it’s the clamp-like part over the rotor. Remove caliper bolts (usually 12-17mm). If stuck, tap with a mallet.
Step 3: Slide caliper off. If pads are seized, use a pry bar gently between pad and rotor to loosen. Don’t force; spray brake cleaner to dissolve gunk.
Step 4: Compress piston with C-clamp slowly—turn clockwise if it’s a screw-in type on rears. This loosens the inner pad.
Step 5: Remove old pads from bracket. Clean bracket rails with a wire brush, apply anti-seize to prevent future sticking.
Step 6: Install new pads if replacing, or re-lube and reinstall if just loosening. Bolt caliper back (torque to spec, often 25-35 ft-lbs).
Step 7: Pump brakes to seat pads, check fluid level. Test drive slowly.
Common mistake? Over-tightening bolts, stripping threads. I’ve fixed that on Subarus more than once. Pro tip: Always bleed brakes if you open the system.
Installation Tips and Common Mistakes to Avoid
Installing or loosening pads seems straightforward, but pitfalls abound. Tip: Always replace in pairs per axle for even braking. Use high-temp grease on pad backs to reduce noise—I’ve skipped it once on a Jeep and regretted the squeaks.
Mistake: Ignoring rotor condition. If grooved, resurface or replace. I’ve seen DIYers install new pads on bad rotors, wearing them out in weeks.
Another: Not compressing pistons fully, leading to dragging. On rear brakes with parking brake integration, wind back the piston—forgot that on a VW and had to redo the job.
Safety: Never hang calipers by hoses; use wire to suspend. And check for leaks post-install.
From the shop, a buddy once loosened pads on his Chevy without stands—car slipped, nearly crushed his foot. Always use proper support.
Tools and Safety Gear for Brake Pad Work
You don’t need a full shop, but good tools make it easier. Essentials: Floor jack (2-ton min), jack stands, socket set (10-19mm), C-clamp or piston tool ($20 at AutoZone), wire brush, brake lube ($5-10).
For safety: Nitrile gloves, safety glasses, dust mask—brake dust is nasty stuff. In the US, brands like Lisle make great piston retractors.
I’ve jury-rigged with channel locks before, but invest in a proper kit; it pays off on multiple cars.
Maintenance Best Practices for Long-Lasting Brake Pads
Keep pads loose and functional with regular care. Clean calipers every oil change—spray away dust. Lube slides annually.
Drive smart: Avoid hard stops to reduce heat buildup. In salty states like New York, rinse brakes after winter drives.
Inspect visually during tire swaps. I’ve extended pad life on my Tacoma by 20% just with cleaning.
Tip: Use premium pads in hot climates like Arizona to fight fade.
How to Spot Genuine vs Fake Brake Pads
Counterfeits flood the market, especially online. Genuine pads have holograms or serials—check with makers like ACDelco.
Fakes feel lighter, lack chamfered edges. I’ve seen knockoffs on eBay shred rotors on a Dodge Ram.
Buy from trusted US spots: O’Reilly, NAPA, or dealer. Scan QR codes if available.
Anecdote: A customer brought in “bargain” pads for his Ford; they disintegrated at 5,000 miles. Stick to reputable brands.
Personal Stories from the Garage: Brake Pad Fixes Gone Right (and Wrong)
Back in my early days wrenching, I had a ’98 Honda Civic come in with pads so stuck the owner thought the caliper was shot. Loosened them with some WD-40 and a pry, saved him $200. Felt like a hero.
But I’ve botched it too—once on a BMW, I pried too hard and scored the rotor. Lesson: Patience wins.
Common question: “Why do my new pads squeal?” Usually, no grease or bedding-in needed. Drive easy first 200 miles.
Another: Trucks like Silverados need heavy-duty pads for towing; I’ve swapped organics for semi-mets, transformed braking.
Brake Pads for Popular US Vehicles: Compatibility Insights
For sedans like the Honda Accord, ceramic pads from Akebono fit great, low dust.
Trucks? Ford F-150 loves Power Stop for bite.
SUVs: Jeep Wranglers need off-road capable like EBC.
Check compatibility via VIN at parts stores—I’ve matched pads for hybrids like Prius, where regenerative braking changes wear.
Pros: Vehicle-specific pads optimize performance. Cons: Wrong fit causes noise or failure.
Pros and Cons of Different Brake Pad Materials
Organic: Pros—quiet, cheap ($30-50); cons—wear fast, dusty.
Semi-metallic: Pros—durable, good heat (40,000+ miles); cons—noisy, rotor wear.
Ceramic: Pros—low dust, quiet; cons—pricey ($60+), less bite in cold.
I’ve preferred ceramics on my daily driver for clean rims.
Conclusion
Wrapping this up, brake pads are crucial for safety, performance, and keeping repair bills low. Whether loosening stuck ones or swapping fresh sets, approach with care, tools ready, and knowledge in hand. Make smarter buys by weighing OEM reliability against aftermarket value, always prioritizing fit for your US-market ride. After any brake work, bed in pads with 5-10 moderate stops from 30 mph—builds that glaze for optimal friction.
FAQ
What causes brake pads to stick and how can I prevent it?
Sticking comes from rust, dirt, or lack of lube on slides. Prevent with annual cleaning and anti-seize on brackets. I’ve seen it most in wet areas—regular rinses help.
Are ceramic brake pads worth the extra cost?
Yes, for low dust and noise, especially on clean-kept cars. But for heavy use, semi-metallic might edge out. In my experience, they last similar miles but keep wheels spotless.
How often should I check my brake pads?
Every 10,000 miles or during tire rotations. Measure thickness—if under 3mm, replace. I’ve caught issues early this way, avoiding bigger problems.
Can I loosen brake pads without removing the wheel?
Rarely—usually need wheel off for access. But if just testing, pump pedals with car off to compress. Full loosening requires disassembly.
What’s the difference between front and rear brake pads?
Fronts handle 60-70% braking, wear faster, often larger. Rears might have integrated parking brake. I’ve swapped more fronts on FWD cars like Civics.
