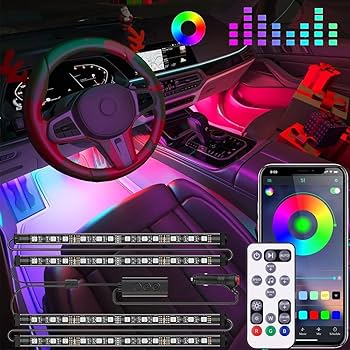
Have you ever noticed how the right interior car lights can completely change the look and feel of your vehicle? Whether your lights have dimmed over time or you want to add a personal touch, changing them yourself is easier than you might think.
In this guide, you’ll discover simple steps to upgrade your car’s interior lighting quickly and safely. By the end, you’ll have the confidence to brighten up your ride exactly the way you want. Ready to transform your car’s interior? Let’s get started!

Credit: www.amazon.com
Tools Needed
Changing interior car lights is a simple task with the right tools. Having the correct tools saves time and prevents damage to your car’s interior. Below are the essential tools needed for this job.
Flathead Screwdriver
A flathead screwdriver helps pry off light covers gently. It fits into small gaps without scratching surfaces. Use one with a thin blade for better control.
Phillips Screwdriver
Some interior lights use screws that require a Phillips screwdriver. This tool has a cross-shaped tip to fit those screws. Keep it handy to remove and replace screws easily.
Replacement Bulbs
Use the correct replacement bulbs for your car model. Check the owner’s manual or the old bulb for size and type. LED bulbs are a popular choice for brighter light and longer life.
Gloves
Wear gloves to protect the bulbs from oil and dirt on your hands. Clean bulbs last longer and work better. Gloves also protect your hands from sharp edges.
Plastic Pry Tool
A plastic pry tool helps remove plastic covers without scratching. It is safer than using metal tools on delicate surfaces. Use it to ease off panels smoothly.
Locate Interior Lights
Start by finding the interior lights inside your car’s roof or dashboard. Most lights have a cover you can gently pry off. Check your car manual for exact locations and details.
Finding the interior lights in your car is the first step to change them. These lights help you see inside your vehicle at night or in dark places.
Interior lights are usually small and can be hidden. Knowing their common locations saves time and effort.
Ceiling Lights
Most cars have ceiling lights in the front and back seats. These lights are often in the center of the roof or near the rearview mirror. They provide the main source of light inside the car.
Door Panel Lights
Some vehicles have lights inside the door panels. These lights turn on when you open the door. They help you see the ground and inside door handles.
Dashboard And Footwell Lights
The dashboard often has small lights to make controls visible at night. Footwell lights sit near the floor to brighten the driver’s and passenger’s feet area.
Trunk And Cargo Area Lights
Don’t forget to check the trunk or cargo area. These spaces usually have small lights that turn on when you open the trunk or hatch.
Remove Light Covers
Removing light covers is the first step to change interior car lights. This step gives access to the bulbs inside. Light covers protect bulbs and keep them clean. Removing them carefully prevents damage to both the cover and the car.
Some covers snap off easily. Others need a tool to pry them loose. Knowing the right method makes the job faster and safer.
Locate The Light Cover
Find the light cover you want to remove. It is usually on the ceiling or near the doors. Look for small tabs or edges around the cover.
Use The Right Tool
Use a flat screwdriver or plastic trim tool. Plastic tools reduce the risk of scratching. Insert the tool gently under the edge of the cover.
Apply Gentle Pressure
Push the tool carefully to release the clips. Do not force the cover. Wiggle it slightly if it feels stuck. Avoid breaking the plastic parts.
Remove The Cover Slowly
Once loose, pull the cover away with your hands. Hold it firmly to avoid dropping. Set it aside in a safe place.

Credit: www.amazon.com
Take Out Old Bulbs
Removing old bulbs is the first step to change your car’s interior lights. It helps prepare the space for new, brighter bulbs. This process is simple and takes only a few minutes.
Be careful while taking out the bulbs. They can be fragile and may break easily. Use gentle force and avoid touching the glass part with your fingers. Dirt and oil can shorten the bulb’s life.
Locate The Interior Light Cover
Find the light cover inside your car. It is usually on the ceiling or near the doors. Some covers snap off, while others need a screwdriver. Check your car manual for exact location and removal tips.
Remove The Light Cover
Use a flat tool or your fingers to pry off the cover. Do this slowly to avoid cracking the plastic. Set the cover aside in a safe place. It will be needed to put back after bulb replacement.
Take Out The Old Bulb
Hold the bulb gently and pull it straight out. Some bulbs twist to release, so turn them slightly if needed. If the bulb is stuck, wiggle it carefully. Avoid using too much force to prevent damage.
Choose Replacement Bulbs
Choosing the right replacement bulbs is key to changing your interior car lights. The correct bulb ensures proper brightness and fit. Using the wrong bulb can cause poor lighting or damage. Spend time selecting bulbs that match your car’s needs.
Check Your Car Manual
The car manual lists the bulb types for each interior light. Find the exact bulb size and model. This step saves time and avoids buying the wrong bulb.
Understand Bulb Types
Common interior bulbs include LED, halogen, and incandescent. LED bulbs last longer and use less power. Halogen bulbs are brighter but get hot. Incandescent bulbs are cheaper but burn out faster.
Match Bulb Size And Base
Bulb size matters for fitting into the light socket. Bases differ too—bayonet, wedge, or festoon. Choose bulbs that fit securely to prevent flickering.
Consider Brightness And Color
Brightness is measured in lumens. Higher lumens mean brighter light. Color temperature affects the light’s look—warm white or cool white. Pick what suits your style and comfort.
Buy Quality Bulbs
Cheap bulbs may fail quickly or cause electrical issues. Select bulbs from trusted brands for safety and durability. Quality bulbs improve your car’s interior lighting experience.
Install New Bulbs
Installing new bulbs in your car’s interior is a simple way to brighten up your ride. This step gives your vehicle a fresh look and improves visibility inside. Follow these easy steps to replace the bulbs safely and correctly.
Choose The Right Bulbs
Select bulbs that match your car’s specifications. Check the owner’s manual or old bulb for size and type. Using the correct bulb ensures proper fit and brightness.
Handle Bulbs With Care
Hold new bulbs by the base, not the glass. Oils from fingers can shorten bulb life. Wear gloves or use a clean cloth to avoid damage.
Insert The Bulb Properly
Align the bulb with the socket carefully. Push or twist it gently until it fits securely. Avoid forcing the bulb to prevent breakage.
Test The New Bulb
Turn on the car’s interior lights to check the bulb. Ensure it lights up evenly and stays steady. If it flickers, reseat the bulb or check the connection.
Test The Lights
Testing the interior car lights ensures they work correctly after replacement. This step helps avoid any issues before finishing the job. It confirms the new bulbs are installed properly and safe to use.
Testing is quick and easy. It saves time and effort later. Make sure to check all lights inside the car for full brightness and function.
Turn On The Car’s Electrical System
Start by turning the car key to the accessory position. This powers the interior lights without starting the engine. Check the dashboard lights to confirm the system is active.
Switch On Each Interior Light
Manually switch on every light inside the car. Look for brightness and steady glow. If a light flickers or stays off, it may need adjusting or a new bulb.
Check For Proper Light Color
New bulbs should shine with the right color and brightness. Dim or off-color lights might mean a wrong bulb type or poor connection. Replace or fix any incorrect lights.
Inspect For Flickering Or Unstable Lights
Observe the lights for flickering or dimming. Flickering can signal loose wiring or bad contacts. Tighten connections or inspect the wiring as needed.
Test Lights With Doors Open And Closed
Open and close each door to check the lights react properly. Interior lights usually turn on with open doors and off when closed. Make sure this function works smoothly.

Credit: www.amazon.com
Reattach Covers
Reattaching the covers after changing your interior car lights is the last step. It protects the new bulbs and keeps your car’s interior neat. Take care to fit the covers properly. A loose cover can fall off or cause damage.
Align The Cover Correctly
Check the shape of the cover and the holder. Match the tabs or clips on the cover with the slots on the light fixture. This helps the cover fit snugly and stay in place.
Press The Cover Firmly
Push the cover gently but firmly until you hear a click or feel it lock. Avoid using too much force to prevent breaking the cover or clips.
Turn on the car’s interior lights to see if they work. If the cover is properly attached, the light will shine clearly without flickering.
Clean The Cover Surface
Wipe the cover with a soft cloth to remove fingerprints or dust. This keeps the light bright and your car interior clean.
Tips For Led Upgrades
Upgrading your car’s interior lights to LED bulbs improves brightness and saves energy. LEDs last longer than traditional bulbs and create a modern look. Small steps make the upgrade easy and safe.
Follow these tips to choose and install LED lights correctly. Proper care helps avoid damage and ensures the best results inside your car.
Choose The Right Led Bulbs
Select bulbs that fit your car’s light sockets exactly. Check the size and type before buying. Use bulbs designed for interior use to avoid flickering or poor fit.
Handle Leds With Care
Avoid touching the LED surface with bare hands. Oils from skin can reduce bulb life. Use gloves or a clean cloth when installing LEDs.
Check Polarity Before Installation
LEDs have positive and negative sides. Test the bulb in the socket before fully installing. Flip the bulb if it does not light up at first.
Use A Compatible Voltage
Match the LED bulb voltage to your car’s system. Most cars use 12 volts. Using the wrong voltage can damage bulbs or wiring.
Test Lights Before Final Assembly
Turn on your car’s interior lights to test LEDs after installation. Check for steady light without flickers. Fix any issues before reassembling parts.
Frequently Asked Questions
How Do I Change Interior Car Lights Safely?
Turn off the car and disconnect the battery first. Use a screwdriver to remove light covers carefully. Replace the bulb with the correct type. Reassemble the cover and reconnect the battery. Always handle bulbs with gloves to avoid damage.
What Tools Are Needed To Change Car Interior Lights?
You typically need a flathead screwdriver, gloves, and replacement bulbs. Some cars may require a Phillips screwdriver. Check your car manual to confirm the bulb type and tools required. Having the right tools makes the process quick and easy.
Can I Upgrade To Led Interior Car Lights?
Yes, LED bulbs are a popular upgrade for better brightness and energy efficiency. Ensure you buy the correct size and type for your car. LEDs last longer and use less power than traditional bulbs. Installation is similar to regular bulb replacement.
How Often Should I Replace Interior Car Lights?
Replace interior lights when they dim or stop working. On average, bulbs last between 1 to 5 years depending on usage. Regularly check your lights for signs of wear. Prompt replacement ensures safety and a well-lit interior.
Conclusion
Changing interior car lights can improve your driving experience. The process is simple and saves money. Follow the steps carefully for safety and best results. Choose the right bulbs for your car model. Take your time and double-check connections. Bright interior lights help you see better at night.
Enjoy a fresh look inside your car today. Small changes can make a big difference. Keep your car cozy and well-lit on every trip.


