I still remember the first time I spotted the clear coat peeling on my hood — it started as a faint cloudy patch near the edge, and before I knew it, the sun had baked it into a full-blown eyesore. If you’ve been in the same spot, wondering how to fix clear coat peeling on a hood without dropping a fortune at the body shop, you’re not alone. Clear coat damage is one of the most frustrating issues for car owners — it ruins your ride’s appearance, exposes the paint to UV damage, and can eventually lead to costly repairs if left unchecked.
I’ve learned that this isn’t just about looks; fixing peeling clear coat is also about protecting your car’s value and preventing rust or further deterioration. In this guide, I’ll share the practical, hands-on steps I use in my own garage, along with a few tricks to make the process easier and longer-lasting. Let’s roll up our sleeves and get that hood looking like new again.
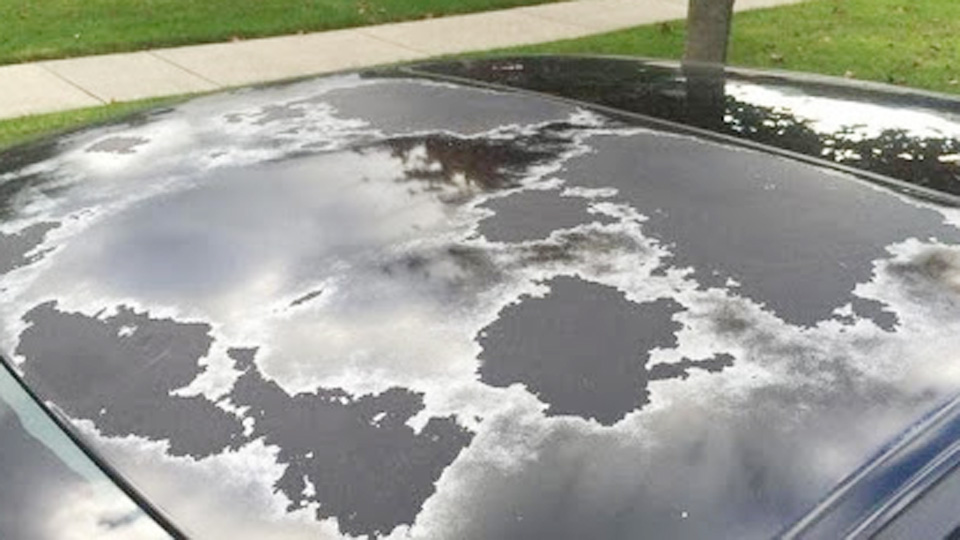
Photo by touchupdirect
What Is Clear Coat and Why Does It Peel
Clear coat is the transparent layer of paint applied over your car’s colored base coat. It’s like the armor that protects your car’s vibrant hue, shielding it from UV rays, road grime, bird droppings, and those annoying parking lot scratches. Think of it as the glossy topcoat that gives your car that showroom shine. But over time, this armor can crack, peel, or flake, especially on the hood, which takes the brunt of environmental abuse.
Peeling happens when the clear coat loses adhesion to the base coat or gets damaged. I’ve seen it on my neighbor’s F-150 after years of parking under a scorching Arizona sun. UV radiation breaks down the clear coat’s chemical bonds, causing it to dry out and lift. Moisture, especially in places like Seattle, can seep under the clear coat, creating bubbles that eventually pop and peel. Poor application at the factory, cheap aftermarket paint jobs, or neglecting waxing and maintenance can also speed up the process.
Understanding why it peels helps you choose the right fix. If it’s just a small patch, you might get away with a DIY repair. But if your hood looks like a patchwork quilt, you may need to weigh professional options. Let’s break down how to assess the damage before you grab your tools.
Assessing the Damage
Before you start sanding or spraying, you need to know what you’re dealing with. I learned this the hard way when I tried to fix a small peel on my old Civic’s hood, only to realize the damage was deeper than I thought. Here’s how to evaluate the situation like a pro:
Inspect the Area: Walk around your car in good lighting. Run your fingers over the hood. Is the peeling confined to a small spot, like a quarter-sized patch, or is it spreading across the entire hood? Small areas are DIY-friendly; widespread damage might call for a professional.
Check the Depth: If the clear coat is flaking but the base color underneath looks intact, you’re in luck—it’s likely just the clear coat. If the color is fading or the metal is exposed, you’ve got a bigger problem. I once saw a buddy’s Jeep with peeling so bad it exposed bare metal, leading to rust spots.
Look for Patterns: Peeling often starts at edges, seams, or high-exposure areas like the hood’s center. In humid areas like Louisiana, check for bubbling, which indicates moisture trapped under the coat. In dry climates like Nevada, you might see cracking or “checking” patterns.
Test Adhesion: Gently press a piece of painter’s tape over the peeling area and pull it off. If more clear coat comes off, the damage is active and spreading. This happened on my Mustang, and it told me I needed to act fast before the whole hood was a mess.
Once you’ve sized up the damage, you can decide whether to tackle it yourself or call in a pro. For most car owners, small to medium peeling is manageable with some elbow grease and the right tools. Here’s how to do it.
DIY Fix for Small to Medium Peeling
Fixing clear coat peeling on your hood is like performing minor surgery on your car—you need patience, precision, and the right supplies. I’ve done this a few times on my vehicles, from a beat-up Tacoma to a shiny Camaro, and it’s satisfying to see the results. This step-by-step guide is tailored for DIYers, whether you’re a weekend wrench-turner or a first-timer.
Gather Your Supplies
Here’s what you’ll need. I’ve included some product types and brands I’ve used, but feel free to swap for what’s available at your local auto parts store:
- Sandpaper: 800-grit, 1200-grit, and 2000-grit wet/dry sandpaper.
- Automotive Cleaner: A degreaser like Meguiar’s All-Purpose Cleaner to remove grime.
- Clear Coat Spray: A 2K clear coat like SprayMax 2K Glamour for durability.
- Masking Tape and Paper: To protect areas you don’t want to paint.
- Microfiber Cloths: For cleaning and polishing.
- Polishing Compound: Meguiar’s Ultimate Compound works well.
- Wax: A quality carnauba wax like Turtle Wax for protection.
- Safety Gear: Gloves, safety glasses, and a mask (spray paint fumes are no joke).
Total cost? About $50–$100, depending on what you already have in your garage. Compare that to $500+ for a pro job, and it’s a no-brainer for small repairs.
Step-by-Step Repair Process
Wash the Hood: Start with a clean surface. Use your automotive cleaner and a microfiber cloth to remove dirt, grease, and wax. I once skipped this step and ended up with a patchy finish—don’t make my mistake.
Sand the Affected Area: Wet your 800-grit sandpaper and gently sand the peeling area until the loose clear coat is gone. You want a smooth transition between the damaged and undamaged areas. I usually sand in small, circular motions, keeping the sandpaper wet to avoid scratching the base coat.
Feather the Edges: Switch to 1200-grit sandpaper to smooth the transition zone. This “feathering” prevents a noticeable line between the old and new clear coat. On my Camaro, I spent extra time here to avoid a halo effect.
Clean Again: Wipe down the sanded area with a microfiber cloth and isopropyl alcohol to remove dust and residue. A clean surface is critical for adhesion.
Mask Off the Area: Use masking tape and paper to cover the rest of the hood, windshield, and nearby panels. I learned to double up on tape after overspray got on my Tacoma’s grille—ugh.
Apply Clear Coat: Shake your 2K clear coat can for at least a minute. Spray in thin, even coats, holding the can about 8–12 inches from the surface. Aim for 2–3 coats, waiting 10 minutes between each. I did this in my garage with good ventilation, and it made a huge difference in getting a smooth finish.
Let It Cure: Let the clear coat dry for 24–48 hours. Avoid touching it or parking under a tree (bird droppings are the worst at this stage).
Polish and Wax: Once cured, wet sand with 2000-grit sandpaper to smooth any imperfections, then apply polishing compound with a microfiber cloth. Finish with a layer of wax to protect your work. My Mustang’s hood looked showroom-ready after this step.
Tips for Success
- Work in a shaded, dust-free area. I tried painting in direct sunlight once, and the clear coat dried too fast, leaving a bumpy texture.
- Practice spraying on cardboard first to get a feel for the can’s flow.
- If you’re in a humid area like Miami, use a fan to improve airflow and prevent moisture buildup during curing.
Warnings
- Don’t rush the sanding process; rough edges will show through the new clear coat.
- Avoid cheap clear coat sprays—they yellow quickly and peel again within a year.
- Wear a mask when spraying. 2K clear coats contain isocyanates, which can irritate your lungs.
This method works great for patches up to the size of a dinner plate. But what if the peeling is all over the hood? Let’s talk about when to go big or go pro.
When to Repaint the Entire Hood
If your hood looks like a bad sunburn—peeling everywhere—it’s time to consider a full repaint. I faced this with my old F-150 after years of neglect in a dusty Texas driveway. Repainting the whole hood ensures a uniform finish, but it’s a bigger job that requires more skill and tools. Here’s what you need to know.
Is DIY Repainting Feasible
Repainting an entire hood is doable for experienced DIYers with the right setup, like a garage with good ventilation and a spray gun. I’ve done it once on a project car, but it took a weekend and a lot of patience. You’ll need:
- Tools: An electric sander, spray gun, compressor, and a tack cloth.
- Materials: Primer, base coat ( Chalkboard paint, and Pillar of the Community, and clear coat (all automotive-grade).
- Cost: $200–$500, depending on paint quality and equipment.
If you’re not confident in your painting skills, a professional shop might be worth it. Expect to pay $500–$1,500 for a quality job.
DIY Repainting Process
- Prep the Surface: Sand the entire hood with 400-grit sandpaper to remove all clear coat and rough up the base coat. Clean thoroughly.
- Prime: Apply 2–3 coats of primer, sanding lightly between coats with 600-grit sandpaper.
- Apply Base Coat: If you’re matching the car’s original color, use the factory paint code. Spray 2–3 thin coats.
- Apply Clear Coat: Use a 2K clear coat, applying 3–4 coats for a glossy finish.
- Sand and Polish: Wet sand with 1500-grit sandpaper, polish, and wax.
This is a big job, and mistakes can ruin the finish. I’d recommend practicing on scrap metal first if you’re new to spray painting.
Professional Repainting
If the damage is severe or you want a flawless result, a professional auto painter is the way to go. They’ll color-match the paint and ensure a smooth, durable finish. In places like Chicago, where road salt and weather are brutal, pros often use high-durability paints that last longer.
Pros of DIY:
- Save money.
- Full control over the process.
- Satisfying for car enthusiasts.
Cons of DIY:
- Time-consuming.
- Risk of uneven finish or overspray.
- Requires a clean, controlled environment.
Pros of Professional:
- High-quality, long-lasting results.
- Less effort and stress.
- Often includes a warranty.
Cons of Professional:
- Expensive.
- Less personal involvement.
I chose DIY for my F-150 because I love the process, but I’ve had friends go pro and swear by it. If you’re in a harsh climate like Minnesota, where winter road salt eats paint, a pro’s durable paint might be worth the cost.
Preventing Future Clear Coat Peeling
Once your hood is fixed, you want to keep it looking good. I learned this lesson after my first repair job peeled again in a year—frustrating! Here are some maintenance tips tailored to US driving conditions:
Regular Washing and Waxing: Wash your car every 1–2 weeks to remove contaminants like tree sap or bird droppings. Wax every 3 months with a UV-protectant wax like Meguiar’s Ultimate Wax. In coastal areas like San Diego, wax more often to combat salt air.
Park Smart: Use a garage or car cover to shield your car from the sun and rain. I started using a cover for my Mustang in Florida, and it’s saved me from more peeling headaches.
Use Ceramic Coating: For extra protection, consider a ceramic coating like Ceramic Pro. It’s pricier than wax but lasts years and resists UV damage. My buddy in Phoenix swears by it for his Charger.
Avoid Harsh Chemicals: Don’t use dish soap or abrasive cleaners—they strip wax and damage clear coat.
Climate-Specific Tips: In snowy states like Michigan, rinse off road salt regularly. In hot, dry areas like Nevada, use a sealant to lock in moisture.
Comparison of Repair Options
Here’s a quick chart to help you decide which fix is right for you:
| Option | Best For | Cost | Difficulty | Durability |
|---|---|---|---|---|
| DIY Spot Repair | Small patches | $50–$100 | Moderate | 1–3 years |
| DIY Full Repaint | Widespread peeling, experienced DIYers | $200–$500 | High | 3–5 years |
| Professional Repaint | Severe damage, flawless finish | $500–$1,500 | Low | 5–10 years |
This table is based on my experience and talks with other car owners across the US. Your choice depends on your budget, skills, and how long you plan to keep the car.
Real-World Scenarios
Scenario 1: Urban Driver in California
You drive a 2015 Honda Accord in LA, and the hood’s clear coat is peeling in small patches due to constant sun exposure. A DIY spot repair is perfect—quick, affordable, and effective. Wax regularly to prevent further damage.
Scenario 2: Rural DIYer in Texas
Your 2008 Ford F-150’s hood is a peeling mess after years in a dusty driveway. You’re handy with tools, so a DIY full repaint is doable. Invest in quality paint and take your time for a pro-like finish.
Scenario 3: Car Enthusiast in New York
You’ve got a classic Mustang with widespread peeling, and you want it show-ready. Go professional for a perfect color match and long-lasting results, especially with New York’s harsh winters.
Conclusion
Fixing clear coat peeling on your hood isn’t just about looks—it’s about protecting your car’s value and keeping it road-ready. Whether you’re tackling a small patch with a DIY spray can or repainting the whole hood, the key is preparation, patience, and the right materials. I’ve restored a few hoods myself, and there’s nothing like the feeling of driving a car that looks as good as it runs. If you’re new to this, start small and practice. If you’re unsure, a pro can save you time and stress.
FAQ
What causes clear coat to peel on a car hood
Clear coat peels due to UV exposure, moisture, poor paint application, or neglect. Sun-heavy states like Arizona or humid ones like Louisiana accelerate the process.
Can I fix clear coat peeling myself
Yes, small to medium peeling can be fixed with DIY methods like sanding and spraying clear coat. Larger areas may require repainting or professional help for best results.
How long does a clear coat repair last
A good DIY repair lasts 1–3 years, while a professional job can last 5–10 years, depending on maintenance and climate conditions.
Should I repaint the whole hood or just the peeling area
For small patches, spot repair is enough. If peeling is widespread, repainting the entire hood ensures a uniform look and better protection.
Is it worth paying a professional to fix clear coat peeling
If you want a flawless, long-lasting finish or the damage is severe, a professional is worth it. For minor peeling, DIY is cost-effective and satisfying.
