Changing the oil filter on a car is one of those jobs that seems simple—until you’re lying under the engine with oil dripping down your arm and the filter refuses to budge. I’ve been there plenty of times, and I know the frustration of wondering if you’re doing it right or if you’re about to make a big mess. If you’ve ever searched “how to change the oil filter on a car” because you want to save money on maintenance or make sure the job’s done properly, you’re in the right place.
A clean, properly installed oil filter is essential for keeping your engine running smoothly, preventing harmful debris from circulating through the system, and avoiding costly repairs down the road. The good news? With the right tools, a little know-how, and a few tricks I’ve learned over the years, this task is something any car owner can tackle confidently. Stick with me, and I’ll walk you through the exact steps so you can get it done without the headaches.

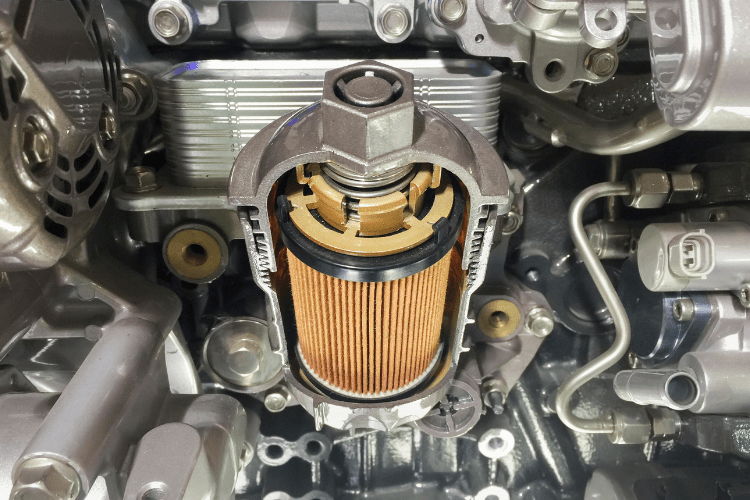
Image by goldeagle
Why Changing Your Oil Filter Matters
Picture this: You’re cruising down I-95 on a hot summer day, and suddenly your engine starts knocking. Not fun, right? That’s often the result of neglected oil maintenance. The oil filter is your engine’s first line of defense against contaminants like metal shavings, dirt, and carbon buildup. Over time, as you drive through varying US conditions—from the humid Southeast to the arid Southwest—these particles accumulate, clogging the filter and forcing dirty oil back into the system.
From my experience, ignoring this can lead to pricey repairs. I once had a buddy with a Chevy Tahoe who stretched his oil changes too far in the cold Midwest winters. The filter got so gummed up that it starved the engine of proper lubrication, leading to a seized bearing. Ouch. Regularly changing it—typically every 3,000 to 5,000 miles for conventional oil or up to 10,000 for synthetics—ensures better engine longevity, smoother performance, and even improved gas mileage. It’s especially important for DIY mechanics and everyday drivers who want to avoid those surprise mechanic bills.
Think about when it matters most. For car enthusiasts modding their rides, a fresh filter supports those performance upgrades. For families hauling kids across states, it means reliability on long trips. And for folks in extreme climates, like snowy New England or scorching Arizona, it prevents oil from thickening or thinning too much, which can strain the filter faster.
Tools and Materials You’ll Need
Before we get our hands dirty, let’s gather what you’ll need. I’ve learned the hard way that skipping a tool can turn a 30-minute job into an all-day frustration. Here’s a straightforward list based on what I’ve used over the years:
- New oil filter (make sure it matches your car’s specs—check your owner’s manual or an auto parts store app)
- Fresh engine oil (quart bottles; synthetic for better protection in hot US summers)
- Oil filter wrench (adjustable or cup-style for a snug fit)
- Drain pan or bucket (to catch the old oil)
- Rags or shop towels (for wipes and spills)
- Gloves (nitrile ones to keep oil off your skin)
- Funnel (for clean oil pouring)
- Jack and jack stands (if the filter is underneath)
- Torque wrench (optional but great for precision tightening)
I like to keep a small table handy in the garage for organizing this stuff. Pro tip: Opt for a magnetic drain plug if your car allows it—it catches metal bits and extends filter life.
For product types, spin-on filters are common in American trucks like the Ford F-150, while cartridge styles show up in European-influenced models like some BMWs. Synthetics offer pros like better flow in cold starts, but cons include higher cost. Always go for OEM or reputable brands to avoid cheap knockoffs that might fail prematurely.
Preparing Your Car for the Oil Filter Change
Safety first, folks. I’ve burned my arm on hot oil once—lesson learned. Start by parking on a level surface, like your driveway, and let the engine cool for at least 30 minutes if it’s been running. This makes the oil drain easier and safer.
Pop the hood and locate the dipstick to check your current oil level. It’s a good habit to note if it’s low or dirty, which might indicate other issues. If your filter is under the car, jack it up securely with stands and chock the wheels. In rainy Pacific Northwest areas, I always work under cover to avoid slipping on wet concrete.
Warm the engine slightly if it’s cold out—say, in a Minnesota winter—to help the oil flow, but shut it off before draining. Gather your tools nearby, and have a trash bag ready for the old filter. This prep step is key for beginners; it builds confidence and prevents mid-job runs to the store.
Step-by-Step Guide to Changing Your Oil Filter
Alright, let’s get to the meat of it. I’ll break this down like I would if you were watching over my shoulder. Remember, consult your owner’s manual for specifics, as layouts vary—top-mounted in many sedans, bottom in trucks.
Locating the Oil Filter
First things first: Find where it’s hiding. In most US cars like a Toyota Camry, it’s right under the hood near the engine block, a cylindrical canister about the size of a soda can. For pickups like my old Dodge Ram, crawl underneath—it’s often on the side of the oil pan.
Use a flashlight if needed, especially in dim garages. If it’s a cartridge type, it’ll be in a housing you unscrew. I’ve helped friends with Subarus where it’s tucked away, so patience is key. Why locate it early? Because spilling oil everywhere if you’re not prepared is a mess no one wants.
Draining the Old Oil
Before touching the filter, drain the oil to reduce pressure and mess. Slide your drain pan under the oil pan plug—usually a bolt at the bottom. Use a wrench to loosen it counterclockwise, but keep a rag handy as oil gushes out.
Let it drain fully, which takes 10-15 minutes. In hot Texas summers, the oil flows quick; in cooler climates, it might be sluggish. Replace the drain plug gasket if worn—it’s cheap insurance against leaks. This step matters because fresh oil without draining leaves contaminants behind, defeating the purpose.
Removing the Old Oil Filter
Now, the fun part. Position your pan under the filter. If it’s spin-on, grab your filter wrench and turn counterclockwise to loosen. It might be tight from heat cycles, so if stuck, tap gently with a mallet or use a screwdriver through the side as a last resort—but carefully to avoid puncturing nearby parts.
For cartridges, unscrew the housing cap and pull out the element. Drain the old filter upside down in the pan overnight if possible. I’ve dealt with over-tightened filters on rental cars; a good wrench makes all the difference. Warning: Oil will spill, so wear old clothes and gloves. Why remove it properly? Leaving bits of the old gasket can cause massive leaks.
Installing the New Oil Filter
Prep your new filter by rubbing a bit of fresh oil on the rubber gasket—this helps it seal and eases future removal. Screw it on by hand clockwise until snug, then give it a three-quarter turn with the wrench. Don’t overtighten; I’ve seen stripped threads from that mistake.
For cartridges, insert the new element and torque the cap to spec—use a torque wrench if you have one. This ensures no leaks and proper pressure. In my experience with high-mileage vehicles, a premium filter here pays off in longevity.
Refilling with Fresh Oil and Checking for Leaks
Pour in the new oil using a funnel—check your manual for capacity and type. Synthetics shine in variable US weather, flowing better in cold snaps. Start with half, then check the dipstick, adding more as needed.
Fire up the engine for a minute, shut it off, and inspect for drips around the filter and plug. Recheck the level after it settles. This final check is crucial; low oil can wreck an engine fast. Pro tip: Drive a short loop and recheck—sometimes air pockets fool the initial read.
Common Mistakes to Avoid
Even seasoned folks like me slip up sometimes. One biggie is forgetting to lubricate the gasket, leading to dry seals and leaks. Another: Overtightening, which makes the next change a nightmare. I’ve seen DIYers skip draining fully, mixing old and new oil—bad for engine health.
Don’t reuse filters; they’re one-and-done. And always dispose properly—many US auto stores take used oil for free. In urban areas like LA, improper dumping can lead to fines. Avoid these, and you’ll keep your car happy.
Troubleshooting Issues After Changing the Filter
What if there’s a leak? Tighten a smidge more or check for old gasket remnants. Engine light on? Might be low oil—top up and reset if needed. Noisy startup? Air in the system; it usually quiets after a drive.
For older cars in salty East Coast roads, corrosion might make plugs seize—use penetrating oil. If problems persist, like in my experience with a finicky Jeep, it could signal bigger issues like a cracked pan. Address these quick to avoid breakdowns.
Variations for Different Car Models
Not all cars are created equal. On a Ford Mustang, the filter’s easy-access under the hood—great for enthusiasts. Chevy Silverados often require jacking, suiting truck owners used to underbody work. Hybrids like the Prius might have unique housings; always cross-reference.
European models in the US, like Audis, use cartridges with specific tools. For compacts like the Civic, space is tight—use an extension on your wrench. These tweaks make the job smoother, reflecting real-world diversity in American garages.
Maintaining Your Oil Filter in Different US Climates and Road Habits
US driving varies wildly. In dusty Southwest deserts, filters clog faster—change more often. Cold Northeast winters thicken oil, stressing filters; use synthetics for better flow. Humid Florida? Moisture can contaminate, so monitor closely.
For highway commuters racking 20,000 miles yearly, stick to schedules. Off-roaders in the Rockies? More frequent changes combat dirt. I’ve adjusted my routine living coast-to-coast, and it keeps engines purring regardless.
When to Seek Professional Help
I’m all for DIY, but know your limits. If you’re new and the filter’s in a tough spot, like some SUVs, let a shop handle it first—watch and learn. Persistent leaks or if you’re dealing with warranty work? Pros have the edge.
In my book, if it involves special tools you don’t have, or if mobility issues make crawling under hard, mechanics earn their keep. It’s about safety and doing it right.
Comparison of Oil Filter Types
To help choose, here’s a quick chart:
| Filter Type | Pros | Cons | Best For |
|---|---|---|---|
| Spin-On | Easy install, affordable, common in US trucks | Can leak if not tightened right | Everyday drivers, pickups like F-150 |
| Cartridge | Less waste, better filtration in some models | Harder access, needs housing clean | Modern sedans, eco-conscious owners |
| Magnetic | Catches metal particles | Slightly pricier | High-performance or older engines |
| High-Efficiency | Superior contaminant removal | Higher cost, may restrict flow if overkill | Enthusiasts in dirty environments |
Pick based on your ride and habits—I’ve switched types over years for better results.
Strong Conclusion
Wrapping this up, changing your oil filter on a car is more than a chore—it’s empowering. It keeps your engine clean, extends its life, and saves cash for fun upgrades. Whether you’re a beginner in your first garage or a seasoned wrench-turner, following these steps gives you the confidence to tackle it. Remember, regular maintenance like this resonates with how we drive in the US: far, fast, and freely. Pro tip: Mark your calendar for the next change and always keep spare oil in the trunk. You’ve got this—now go make your car thank you.
FAQ
How often should I change my oil filter?
Aim for every oil change, around 3,000-7,500 miles depending on your oil type and driving. In heavy traffic or extreme weather, do it sooner for optimal engine protection.
Can I change the oil filter without draining the oil?
Technically yes, but it’s not ideal—you’ll miss flushing out old contaminants. I always drain fully for a thorough job, especially on high-mileage vehicles.
What if my oil filter is stuck and won’t budge?
Try a better-gripping wrench or heat the engine slightly to expand metal. If that fails, puncture carefully with a screwdriver for leverage, but watch for mess. Persistent issues? Head to a pro.
Is synthetic oil better for my filter?
Absolutely, it lasts longer and flows better, reducing filter strain in varied US climates. Worth the extra for most modern cars.
How do I dispose of the old oil filter safely?
Drain it overnight, then take to an auto parts store or recycling center—they often accept for free. Never toss in trash; it’s harmful to the environment.


