Driving down a dark road with a burnt-out headlight is a hassle I’ve faced more times than I’d like to admit. Whether it’s a dim beam struggling to cut through the fog or a completely dead bulb leaving you squinting, replacing a car headlight bulb is a straightforward fix that can save you money and keep you safe.
As a car enthusiast who’s spent countless hours tinkering in my garage, I’ve learned that swapping out a headlight bulb is one of those tasks every driver can master with a little guidance. This guide is for you—whether you’re a DIY mechanic, a daily commuter, or a car lover looking to keep your ride in top shape.
I’ll walk you through everything you need to know about replacing a car headlight bulb. From picking the right bulb to avoiding common pitfalls, I’ve got you covered with practical tips drawn from my own experience and the challenges I’ve seen others face.

Image by napacanada
Why Headlight Bulbs Matter for Safe Driving
Headlights are your eyes on the road, especially when visibility is low. A burnt-out or dim bulb doesn’t just make it harder to see—it also makes your car less visible to others, increasing the risk of accidents. I remember driving through a stormy night in rural Ohio, where the roads were pitch-black, and realizing one of my headlights was out. It was a wake-up call to check my bulbs regularly.
In the US, where we deal with everything from snowy Midwest winters to dusty desert highways, headlights take a beating. Temperature swings, road vibrations, and even moisture can shorten their lifespan. Regular maintenance isn’t just about avoiding a ticket (though driving with a faulty headlight can earn you one); it’s about ensuring you and others stay safe.
Signs Your Headlight Bulb Needs Replacing
Before diving into the how-to, let’s talk about when to replace your headlight bulb. Over the years, I’ve noticed a few telltale signs that scream, “Time for a new bulb!” Here’s what to watch for:
Dim or Flickering Lights: If your headlights seem weaker than usual or flicker like a bad horror movie, the bulb is likely nearing the end of its life.
Complete Burnout: One headlight not working at all? That’s a dead bulb or, in rare cases, an electrical issue.
Yellowing or Cloudy Output: Older bulbs, especially halogens, can start to look yellowish, reducing visibility.
Dashboard Warning Light: Modern cars often have sensors that alert you to a faulty bulb via the dashboard.
If you notice any of these, don’t wait. A quick replacement can prevent bigger headaches. I once ignored a dim headlight, thinking it could last a bit longer, only to end up stranded on a backroad with no light at all. Lesson learned.
Types of Headlight Bulbs and Which One’s Right for You
Choosing the right headlight bulb can feel overwhelming with all the options out there. I’ve spent hours at auto parts stores, comparing bulbs for my old Civic and my buddy’s F-150. Here’s a breakdown of the main types you’ll encounter, along with their pros and cons:
| Bulb Type | Pros | Cons | Best For |
|---|---|---|---|
| Halogen | Affordable, easy to replace, widely available | Shorter lifespan (450–1,700 hours), less bright | Budget-conscious drivers, older car models |
| LED | Bright, energy-efficient, long-lasting (up to 10,000 hours) | Higher upfront cost, may require professional installation | Modern vehicles, night drivers, energy savers |
| HID (Xenon) | Very bright, long-lasting (up to 2,000 hours), stylish white light | Expensive, complex installation, potential glare | Luxury cars, performance enthusiasts |
How to Pick the Right Bulb
To find the correct bulb, check your owner’s manual or the old bulb for a code like H7, H4, or 9006. You can also visit an auto parts store or use their online fitment guide. I once grabbed the wrong bulb for my wife’s SUV and wasted an afternoon trying to make it fit—trust me, double-check the specs.
Consider your driving habits too. If you’re cruising city streets, a standard halogen might do the trick. But if you’re tackling long rural drives or harsh weather, LEDs or HIDs could be worth the investment for their brightness and durability. Just make sure the bulb meets local regulations to avoid dazzling other drivers.
Tools and Preparation for a Smooth Replacement
Before you start, gather your tools. I’ve learned the hard way that having everything ready saves time and frustration. Here’s what you’ll need:
- Replacement headlight bulb (matching your car’s specs)
- Clean gloves or a lint-free cloth (to avoid oil on the bulb)
- Phillips or flathead screwdriver (depending on your vehicle)
- Socket wrench or pliers (for some models)
- Optional: Dielectric grease for better connections
Safety First
Park your car on a flat surface, engage the parking brake, and turn off the engine. If the headlights were recently on, let them cool for 15–20 minutes to avoid burns. I once grabbed a hot bulb in a rush and regretted it instantly. Also, disconnect the negative battery terminal to prevent any electrical mishaps, especially in newer cars with sensitive electronics.
Step-by-Step Guide to Replacing a Car Headlight Bulb
Here’s the meat of it—how to replace that headlight bulb like a pro. I’ve done this on everything from compact sedans to bulky trucks, and while each car is a little different, the process follows a similar flow. Follow these steps, and you’ll have a new bulb installed in under 30 minutes.
Step 1: Locate the Headlight Assembly
Pop the hood and find the headlight assembly. It’s usually a clear casing at the front of the engine bay. Some cars, like my old Honda, let you access the bulb directly. Others, like certain GM SUVs, might require you to remove a wheel well liner or even the air filter housing. Check your owner’s manual for specifics. If it’s a tight squeeze, a flashlight and patience are your best friends.
Step 2: Disconnect the Wiring Harness
Find the wiring harness plugged into the back of the bulb. It’s usually held in place by a clip or tab. Gently press the tab and pull the harness away. If it’s stubborn, wiggle it carefully—force can damage the connector. I’ve had to use a small screwdriver to release clips on older cars, but go slow to avoid breaking anything.
Step 3: Remove the Old Bulb
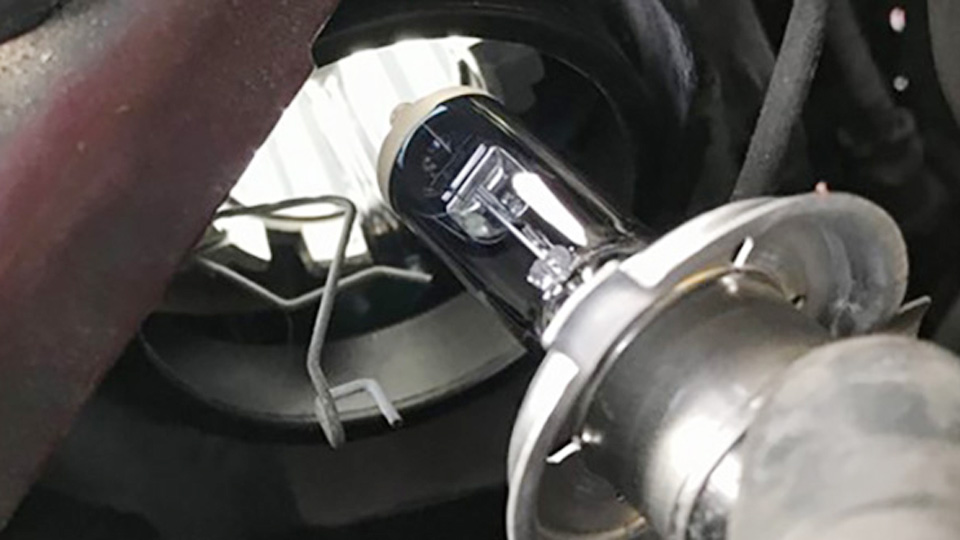
Twist the old bulb counterclockwise to release it from the socket. Most bulbs come out with a quarter-turn. If it’s stuck, check for a locking tab or screw holding it in place. Be gentle to avoid damaging the socket. Once it’s out, inspect the bulb for signs of burnout (like a broken filament) to confirm it’s the issue.
Step 4: Install the New Bulb
Here’s where you need to be careful. Wear gloves or use a clean cloth to handle the new bulb—oils from your skin can shorten its lifespan, especially for halogens. Align the bulb’s tabs with the socket and insert it, then twist clockwise to lock it in place. You’ll usually hear a click when it’s secure. Double-check it’s snug but don’t overtighten.
Step 5: Reconnect and Reassemble
Plug the wiring harness back into the bulb, ensuring it clicks into place. If you removed any covers or components, reattach them securely. I once forgot to replace a dust cover and ended up with a foggy headlight after a rainy drive—don’t make that mistake.
Step 6: Test and Adjust
Reconnect the battery if you disconnected it, then turn on your headlights. Check both low and high beams to ensure they’re working. If the light is misaligned (too high or low), use the adjustment screws on the headlight assembly to fine-tune the beam. Park 25 feet from a wall to check alignment—both beams should hit at the same height.
Common Challenges and How to Overcome Them
Even with a solid plan, things can go sideways. Here are some issues I’ve run into and how to handle them:
Corroded Sockets: If the socket is rusty, clean it with sandpaper or a wire brush. Apply dielectric grease to prevent future corrosion.
Tight Access: Some cars make it tough to reach the bulb. If you’re struggling, try accessing it through the wheel well or consult your manual for alternative routes.
Non-Working Bulb: If the new bulb doesn’t light up, check the wiring connection or test the fuse. I once swapped a bulb only to find a blown fuse was the real culprit.
LED/HID Complexity: These bulbs often require professional installation or even a full assembly replacement. If you’re unsure, call a mechanic.
Tips for Maintaining Your Headlights
Replacing a bulb is just part of the equation. To keep your headlights in top shape, try these tips I’ve picked up over the years:
Replace in Pairs: If one bulb burns out, the other is likely close behind. Replacing both ensures even brightness and color.
Clean the Lenses: Dirt and grime can dim your headlights. Wipe them down with a microfiber cloth and glass cleaner monthly.
Check for Moisture: A foggy headlight means a leak. Seal any cracks with headlight sealant or replace the assembly if needed.
Upgrade Wisely: If you’re considering LEDs or HIDs, ensure your car’s electrical system can handle them. Some aftermarket bulbs can strain wiring or cause error codes in modern vehicles.
When to Call a Professional
Most headlight replacements are DIY-friendly, but some situations call for a pro. If you’re dealing with a sealed LED unit, complex wiring issues, or a damaged headlight assembly, it’s worth the cost to avoid bigger problems. I tried swapping an HID bulb on a friend’s BMW once and ended up at a shop after frying a connector—lesson learned.
Driving Conditions and Headlight Performance
In the US, our driving conditions vary wildly. From icy New England roads to sun-baked Arizona highways, your headlights need to perform. Halogens are fine for mild climates but can struggle in extreme cold or heat. LEDs handle temperature swings better and are great for rural drivers who need maximum visibility. If you’re in a rainy area like the Pacific Northwest, check for lens fogging regularly to maintain clear light output.
Cost Breakdown and Savings
Replacing a headlight bulb yourself is a budget-saver. Here’s a quick look at typical costs:
| Item | Cost Range |
|---|---|
| Halogen Bulb | $10–$30 |
| LED Bulb | $50–$150 |
| HID Bulb | $50–$200 |
| Professional Installation | $50–$150 per bulb |
By doing it yourself, you can save $50–$100 per bulb compared to a shop visit. I once paid $15 for a halogen bulb and swapped it in 20 minutes, avoiding a $75 dealer bill. Plus, it’s satisfying to know you’ve got the skills.
Light Up the Road with Confidence
Replacing a car headlight bulb is one of those tasks that feels intimidating until you do it. With a few tools, a little patience, and this guide, you can tackle it like a seasoned DIYer. Whether you’re fixing a burnt-out bulb or upgrading to brighter LEDs, you’re taking control of your car’s safety and performance. Next time you notice a dim or dead headlight, don’t stress—grab your gloves, pop the hood, and get to work.
Frequently Asked Questions
Can I replace a headlight bulb myself?
Yes, it’s a simple task for most cars. With the right bulb, basic tools, and 20–30 minutes, you can do it at home. Check your owner’s manual for specifics and wear gloves to protect the bulb.
Should I replace both headlights at once?
It’s a good idea to replace bulbs in pairs. If one burns out, the other is likely close behind, and matching bulbs ensure even brightness and color.
How do I know which bulb fits my car?
Check your owner’s manual, look at the old bulb for a code (like H7 or 9006), or use an auto parts store’s fitment guide. Getting the wrong bulb can waste time and money.
What if my new headlight bulb doesn’t work?
Double-check the wiring connection and ensure the bulb is secure. If it still doesn’t work, test the fuse or consult a mechanic for potential electrical issues.
Are LED headlights worth the cost?
LEDs are brighter, last longer, and use less power, making them great for frequent night drivers or harsh conditions. However, they’re pricier and may require professional installation in some cars.


